
Learn how to enable the Live Automatic Transcriptions feature and update your live closed captioning settings in Zoom.
- When logging in to Zoom, if you are asked to enter an email and password, use your Cal Poly email and password. If you are given the option Login with SSO, select it and enter "calpoly" as the company domain.
- To use audio transcription for cloud recordings, you may need to update your recording settings. Go to calpoly.zoom.us > Settings > Recording > Cloud recording > Advanced cloud recording settings > Audio transcript. Click the Save button.
Enable Live Captioning
- From a browser, go to calpoly.zoom.us.
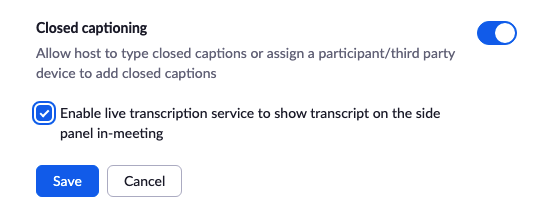
- From the left menu, click Settings, then Meeting > In Meeting (Advanced) > Closed captioning.
- Verify that closed captioning is enabled. If the setting is disabled (gray instead of blue), click the toggle to enable it.
- Check the Enable live transcription service to show transcript on the side panel in-meeting box, then click the Save button.
Start Live Captioning in a Meeting (Host)
The Live Transcript feature becomes available in a meeting after Closed captioning is enabled in Settings (see above).
- Start your meeting.
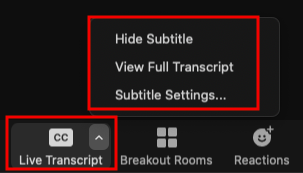
- From the meeting controls, click CC: Live Transcript.
- Under Live Transcript, click Enable Auto-Transcription. You will see the "You have turned on live transcription message.

Adjust Live Captioning Settings in a Meeting (Host and Participants)
From CC: Live Transcript click the arrow and select one of the following options:
Hide/Show Subtitle (Host and Participants) - Hosts can click Hide Subtitle to hide subtitles from the recording.
View/Close Full Transcript (Host and Participants) - Save the full transcript created up until that point by clicking the Save Transcript button at the bottom of the window.
- Subtitle Settings (Host Only)- Zoom app Settings > Accessibility
Related Articles